
How to Measure Your Kitchen for New Cabinets
You do not need a designer to get a cabinet quote. You need a tape measure, a pencil, and about 30 to 45 minutes. This page walks you through it. Do it in this order and the numbers you send us will be good enough to price your kitchen.
Along the way we explain why each number matters. A tape measure gets you wall lengths. It doesn’t get you a kitchen that fits. The things below are what people usually miss, and they’re what cause re-work, gaps, and “why didn’t anyone tell me?” once the cabinets are already installed.
What to grab first
A 25-foot tape measure. A pad of paper. Your phone, for photos.
Write everything in inches, not feet. Measure to the nearest 1/8 inch. Do not round up to be safe. Rounding is what causes a cabinet to get ordered a size too big.
Draw the room first, then measure
Sketch the outline of your kitchen on one sheet of paper. It does not have to be neat or to scale. Label the walls A, B, C, D going clockwise from the door.
Now every number has somewhere to go, and we will know which wall it belongs to.
Measure wall by wall
Take one wall at a time. Three numbers for each:
- Corner to corner. The full length of the wall.
- Corner to each opening. Measure from the corner to the near side of a window or doorway, then measure across the opening itself. Measure to the outside edge of the trim, not inside the frame (more on that below).
- Anything that sticks out. Chimney chases, pipe boxing, columns, radiators and baseboard heat.
Measure at counter height, around 36 inches off the floor. Old walls are rarely square. If the top and the bottom of the same wall come out different, write both numbers down and tell us.
Ceiling height: it decides your wall cabinets
Measure floor to ceiling in a few spots, not just one. Buildings settle, and a room can lose an inch across its length. If there is a soffit or bulkhead above the cabinets, measure how tall it is, how far it drops, and how far it sticks out.
Why this matters: most Chicago condos and homes have an 8-foot ceiling, or close to it. Often it’s really 7’11½”, depending on whether earlier remodels added a layer of flooring. That number, and whether the floor and ceiling are level, decides how tall your wall cabinets can be. Your options:
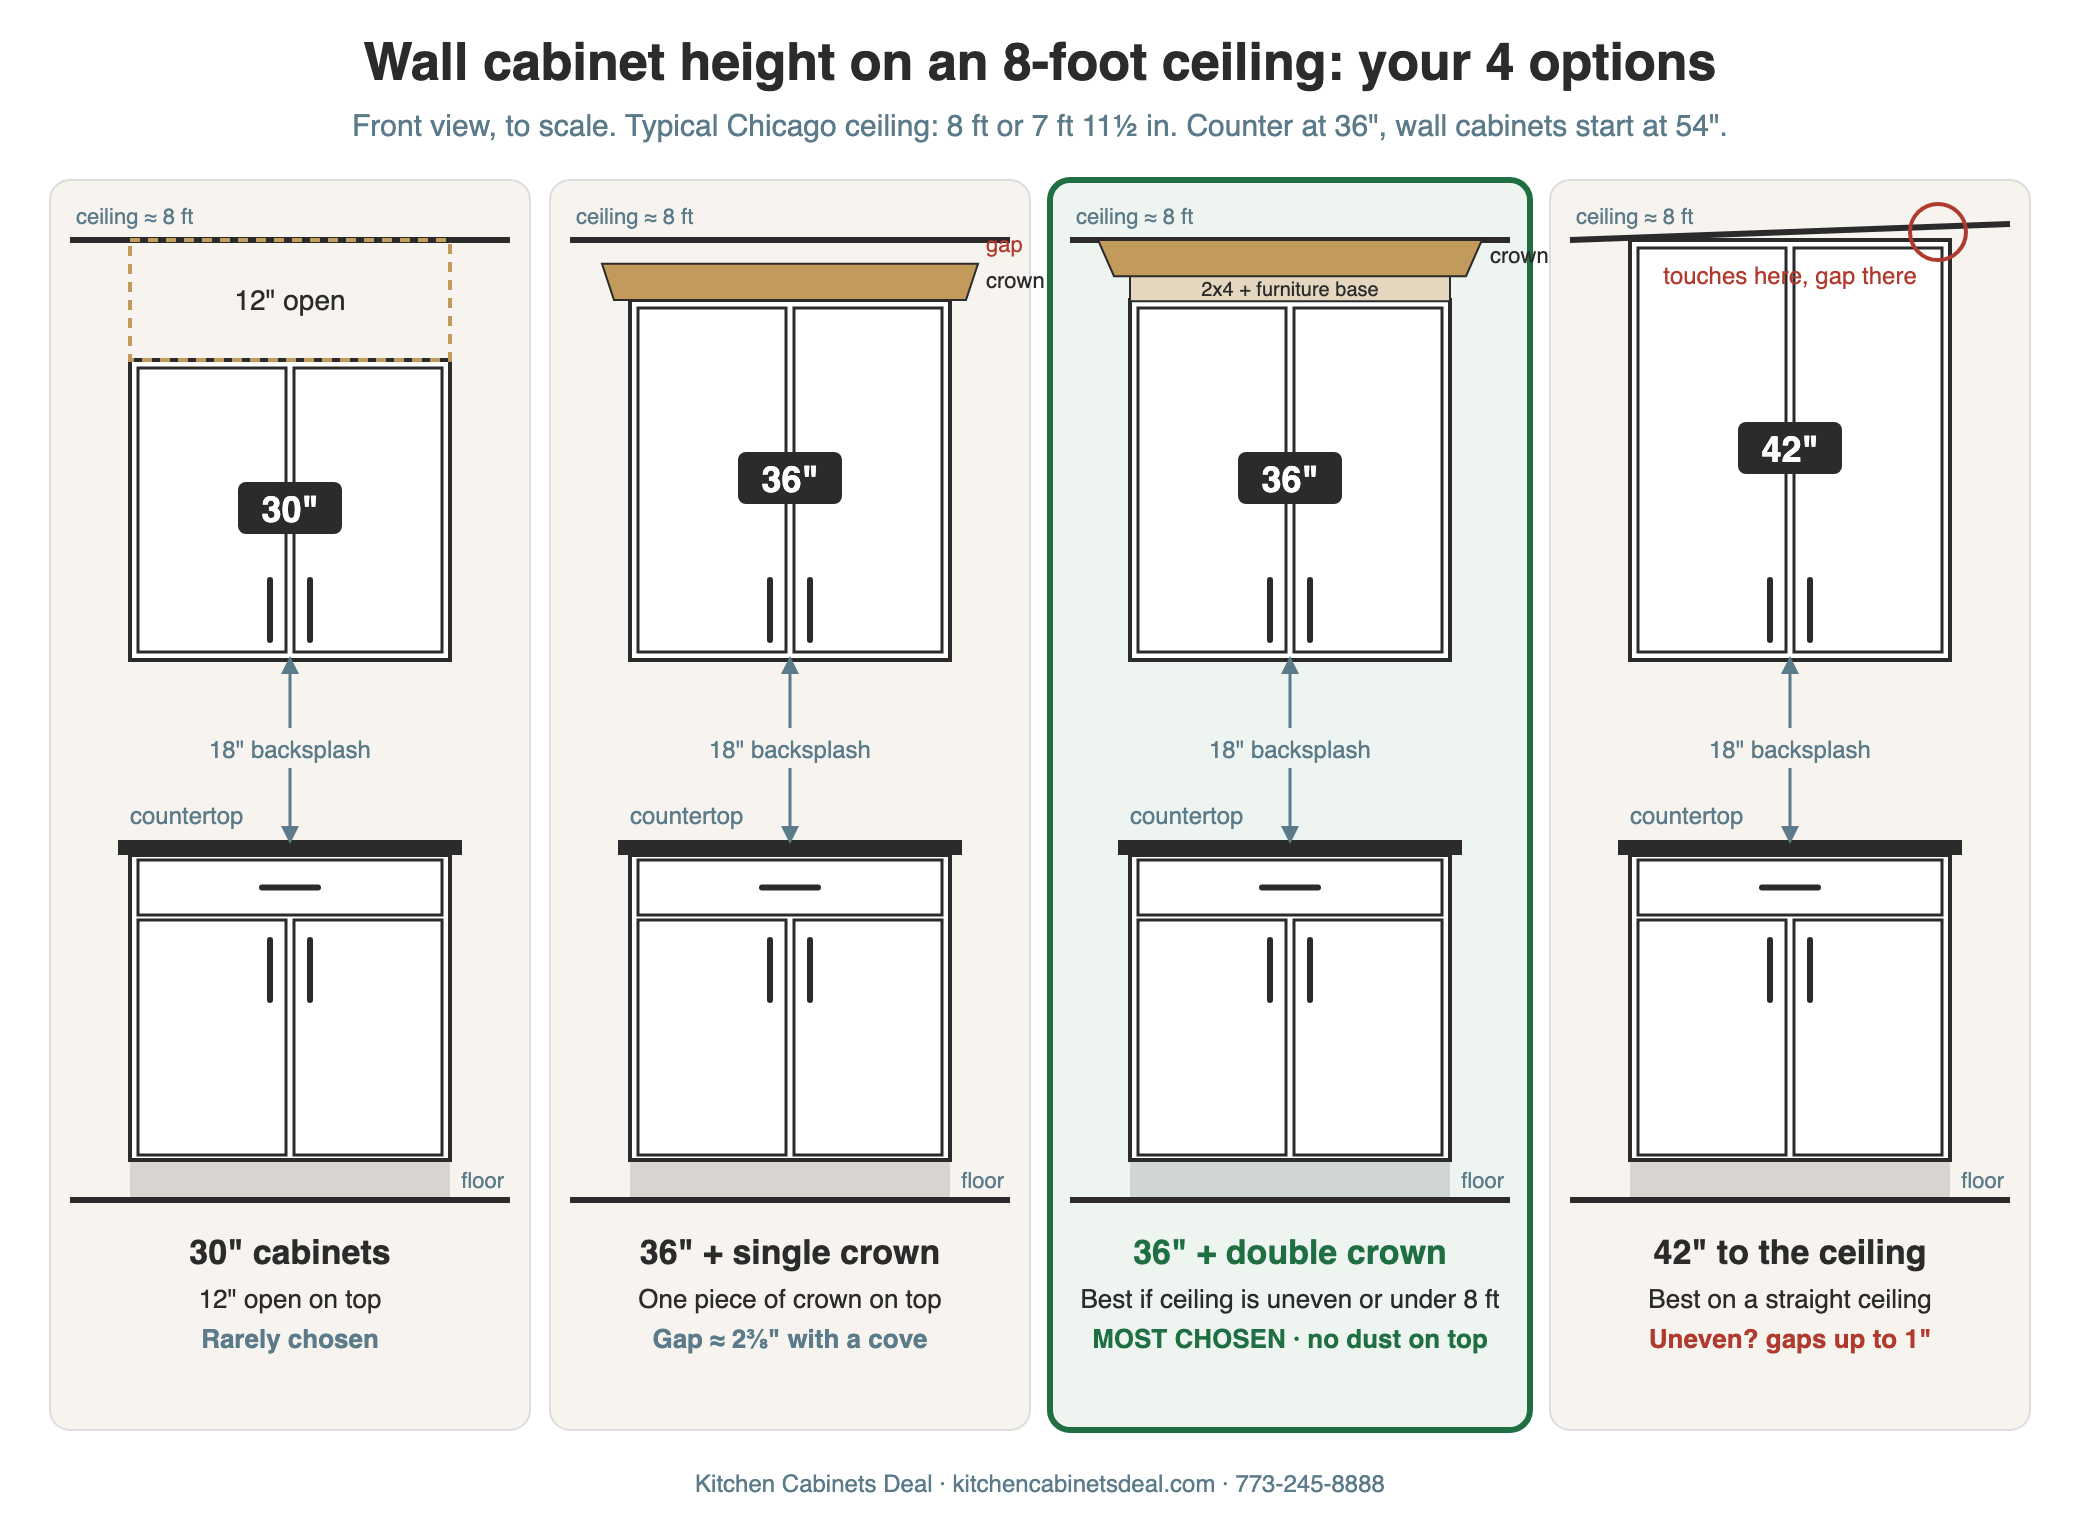
- 30″ wall cabinets. This leaves about 12″ open above them. It’s rarely chosen, but some people like it.
- 36″ wall cabinets, with three ways to finish the top:
- Leave about 6″ open.
- Single crown. One piece of crown molding attached right on top of the cabinets. It usually leaves a gap to the ceiling; how much depends on the crown (about 2⅜” with a 5″ cove on a 6″ space).
- Double crown (the one most people choose). A furniture base goes on the cabinets and crown comes down from the ceiling to overlap it, so it closes all the way to the ceiling, hides an uneven ceiling, and leaves no dust shelf. We especially recommend it when the ceiling isn’t straight or is a little under 8 feet (95″ for example). See how to install double crown molding.
Simple way to remember it: single crown means one piece of molding with a gap left. Double crown means base plus crown, closed all the way to the ceiling.
- 42″ wall cabinets. These go right up to the ceiling. They look great when the ceiling is straight. But if the floor, wall or ceiling is uneven, the cabinets will touch the ceiling in some spots and leave a gap of up to 1″ in others, and that looks bad. In that case, 36″ cabinets with double crown are the better choice. On a ceiling just under 8 feet, 42″ cabinets can still go in with a 17 to 17½” gap above the counter instead of 18″, but some tall appliances like large stand mixers may not fit underneath. We don’t recommend 42″ under a 95″ ceiling, but it’s your kitchen and your call.
Checking the floor and ceiling for level is the hard part to do yourself. If you have a long level or a laser level, check both and tell us what you find. If not, send the heights you measured, or book a measurement and we’ll check it.
Windows and doors: measure outside the trim
Measure each window and door from the outside edge of the trim on one side to the outside edge of the trim on the other. Also write down the height from the floor to the bottom of the window sill, and which way each door swings.
Why this matters: people often send us the window size measured inside the frame. What we need is the full width including the trim, because that’s the wall space where cabinets can’t go.
Tell us how far from the door trim you want the cabinets to start. If a cabinet starts right at the trim and the door opens inward, the cabinet is awkward to open, so we usually leave 12 to 16″.
Gas line, outlets, hood vent, water and the fridge outlet
For each of these, write down two numbers from the nearest corner: where it starts and where it ends (for example, 42″ and 48″):
- The gas line.
- The hood or microwave exhaust vent.
- Outlets and switches.
- The fridge outlet and the fridge water line.
Why this matters: those two numbers tell the designer exactly where a range, hood or microwave can go without you having to move anything. They also keep the fridge’s side panel from landing in the middle of the outlet. If that’s where things are headed, we’ll tell you up front: either we lay the cabinets out to avoid the outlet, or, if the layout works better, you move it.
Under the sink: four things to find
Open the sink cabinet and find four things: hot water, cold water, the drain, and power for the dishwasher. Measure each one the same way, start and end from the nearest corner. Also mark where the sink is now, and where you want it.
Why this matters: all four need to end up inside the new sink base. In Chicago the dishwasher needs a disconnect. That can be a switch above the countertop, but it’s usually an electrical box with a disconnect switch inside the sink cabinet. If there’s no dishwasher, that box can power the garbage disposal instead.
These are what decide whether a cabinet actually fits. Worth two extra minutes.
Planning an island? Measure the open floor
If you want an island, measure the open floor from the sink-run cabinets (or the wall they go on) to the wall or cabinets across from them. Tell us whether you want seating at the island.
Why this matters: we leave at least 36″ for walkways. You can go tighter if the space is really small and you’re fine with it, but 36″ is our minimum. From the island to the sink run we recommend 36 to 42″. Any more than 42″ and you’re taking extra steps every time you go between prepping on the island and washing at the sink. If you want bar stools, the island top needs an overhang, usually 10 to 12″, so we plan where the cabinets stop to give it room.
Appliances come first, then the layout
We design the kitchen around your appliances. That means we need appliance sizes before we can draw anything.
Why this matters: if we lock in, say, a 20″ built-in microwave and you then find a great package deal at Abt that comes with a 24″ one, you either overpay to match the design or miss out on the savings. Designing around your appliances is how we find the most efficient layout and save you money.
For each one, tell us:
- Refrigerator. Width and height. Is it counter-depth. If it is counter-depth, does it take cabinet panels on the front.
- Cooking. Either a free-standing range, or a cooktop with the oven somewhere else. It is one or the other, not both.
- A free-standing range needs the width. That is all.
- A cooktop needs the model number.
- A built-in or wall oven needs the model number too. Tell us whether it is a single wall oven, a double oven, or going into a tall cabinet.
Why the model numbers: we cut the cutout for a cooktop or a built-in oven, and the cutout is different on almost every model. The cabinet is built to it. A free-standing range slides into a gap, so width is enough.
- Above the stove. A standard hood, a decorative hood, an over-the-range microwave, or nothing. If the microwave goes somewhere else, tell us where.
- Sink. Undermount, drop-in, or farm, plus the width. A farm sink needs a model number too, because the sink base is built to match it.
- Dishwasher. The width, and whether it takes a cabinet front or has a finished front of its own.
Have not bought the appliances yet? Say so. Give us the sizes you plan to buy and we will design to those.
Also tell us where you’d like the sink, stove and fridge. Most designers agree those three should form a working triangle, so you’re not walking back and forth all day while you cook. Even if you already have a layout in mind, we’ll show you where the triangle falls.
Take photos of every wall
One photo per wall, standing back far enough to get the whole thing. Then one from each corner of the room.
Photos catch what a tape measure misses. A vent in an odd spot. A radiator. A door that swings into the space you wanted cabinets in. Photograph the sketch too.
What you do not need to worry about
- Do not measure your existing cabinets. We are not matching them.
- Do not work out linear feet, cabinet sizes, or cabinet codes. That is our job.
- Do not worry about being off by a hair. Small differences are normal and we plan for them.
- Do not stop because one number is missing. Send what you have and we will ask about the rest.
Enough to quote, not enough to order
Straight answer on what your own numbers can and cannot do.
They are enough for us to design your kitchen and give you a real, itemized price. They are not enough to order or cut from. Before anything gets ordered, the numbers get verified, either with you against your photos or by measuring the space ourselves.
If you would rather not measure it yourself, we will come and do it. No charge, no obligation.
That is not us hedging. It is how you avoid paying for a cabinet that does not fit.
Send it to us
Two ways. Pick whichever fits where you are.
- You already have a cabinet list. Paste it into the Instant Quote and get an itemized price in under a minute.
- You have measurements but no cabinet list. Request a free design. Send the wall lengths, the ceiling height, and where the windows, doors, and appliances go. We design the layout and send back a quote. Free, no obligation.
Would rather just talk it through? Call the Chicago team at (773) 245-8888, or come by the showroom at 2627 N Kildare Ave.
What you get, and when
If we come out and measure for you, here is exactly how it works.
- We measure your kitchen. It usually takes about an hour.
- You get a full 3D design of your new kitchen, free. Take your time with it and change whatever you want.
- When you are ready to order, we take a deposit, and your dimensioned plan comes with it. That is what we build from.
The design is yours either way. The measured drawing is part of your order.
About your 3D design
We draw every kitchen in 2020 Design, the same software the industry uses. It gives you a real sense of your finished kitchen: the layout, the door style, the color, and how it all fits together.
There are a few details the software simply cannot draw. Double crown molding is one, and there are other small trim details it will not render. Those still get built the way we discuss them, even when the picture does not show them. If a detail matters to you, ask us and we will tell you exactly what you are getting.
Finishes also look different on a screen than they do in your kitchen, so we will always show you real samples before you order.
Why we give you every option
It’s your kitchen, and we build it the way you want. If you have a specific, non-standard requirement, that’s fine. But it’s our job as designers to explain every option, including the downsides, so you make an informed decision. The worst thing that can happen is a homeowner saying, after it’s installed, “Why didn’t you tell me there was an option like that?” Sometimes people are set on an idea and then don’t like how it turns out, so we lay out the choices before anything gets built.
